WiFi 水耕栽培キットに溶存酸素を追加する - Hackster.io
Things used in this project
| Hardware components | |||||
| Atlas Scientific WiFi hydroponics Kit | × | 1 | |||
| Atlas Scientific EZO™ Dissolved Oxygen Circuit | × | 1 | |||
| Atlas Scientific Dissolved Oxgyen Probe | × | 1 | |||
| I2C Toggler | × | 1 | |||
| Windows Computer | × | 1 | |||
| Software apps and online services | |||||
| Arduino IDE | |||||
| ThingSpeak API |
ストーリー
ユーザーがWiFi Hydroponics Kitを作動させ、溶解酸素を追加する準備ができていることが前提となります。
警告:
- Atlas Scientificは一般消費者向けの電子機器を製造していません。この機器は電気エンジニア向けです。電気工学や組み込みシステムのプログラミングに精通していない場合、この製品はあなたには適していないかもしれません。
- このデバイス(WiFi水耕栽培メーター)はWindowsコンピューターを使用して開発およびテストされました。Macでのテストは行われておらず、Atlas Scientificはこれらの指示がMacシステムと互換性があるかどうかを知りません。
ステップ1:溶存酸素データのフィールドを作成する
ThingSpeakのチャネルに移動します。
チャネル設定を選択し、フィールド4を有効にするためのチェックボックスをクリックします。
フィールド4のボックスに記入します。参考までに、私たちは**DO (mg/L)**と入力しました。
ページの最下部にスクロールして、チャンネルを保存をクリックします。
Step 2: Set D.O circuit to I2C
The simplest way to set the D.O circuit to I2C mode is with the I2C Toggler.
1. Select EZO™ circuit type
2. Insert your EZO™ circuit or EZO™ device
3. Plug I2C toggler into USB port/cable
4. Press and hold the button for about 1 second
5. Release after color change: Blue = I2C, Green = UART
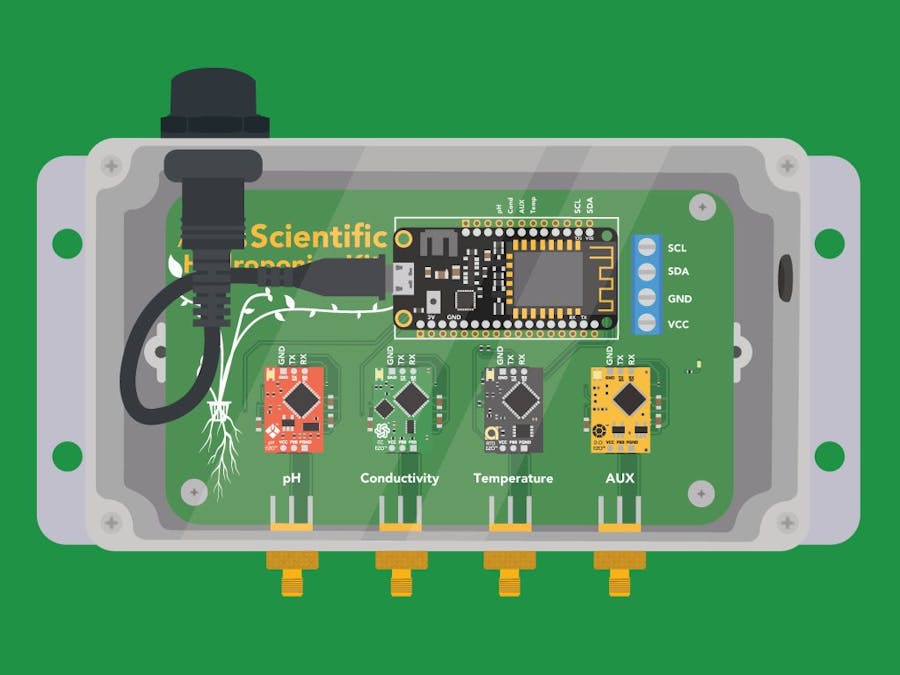
Step 3: Add D.O circuit and probe to meter
After you have put the circuit in I2C mode, insert it into the AUX port of the hydroponics meter and connect the probe to the corresponding SMA connector.
Step 4: Flash the meter with the correct code
In the Arduino IDE go to File> Examples> EZO_I2C_lib-master> Examples> IOT_kits>hydroponics_kit_with_DO
Add your Wi-Fi name, Wi-Fi password, ThingSpeak Channel ID, and ThingSpeak Write API Key to the code.
Set your IDE to the correct target CPU: Tools > Board > Adafruit Esp32Feather
Set the correct port where the CPU is connected. For example, it is connected to COM107: Tools > Port > COM107
Compile and upload the code.
Step 5: Calibrate D.O probe
Atlas Scientific created a list of calibration commands that are built into the library. Type help in the serial monitor to see the list of commands.
Send the command poll. This will let you see the readings once per second, and it will stop uploading to ThingSpeak while you calibrate.
High point calibration
Remove the Dissolved Oxygen probe’s cap and let the probe sit, exposed to air until the readings stabilize. (small movement from one reading to the next is normal).
Once the readings have stabilized, issue the command do:cal
Low point calibration
Resend the poll command.
After you have calibrated the EZO™ Dissolved Oxygen circuit using the "do:cal" command; remove the top of the Zero Dissolved Oxygen calibration solution pouch. Insert the probe and stir it around to remove any trapped air (which could cause readings to go high). Let the probe sit in Zero D.O. calibration solution until readings stabilize. (small movement from one reading to the next is normal).
Once the readings have stabilized, issue the command do:cal,0
Step 6: Upload to ThingSpeak
To resume taking a reading every 15 seconds and uploading it to ThingSpeak issue the datalog command.